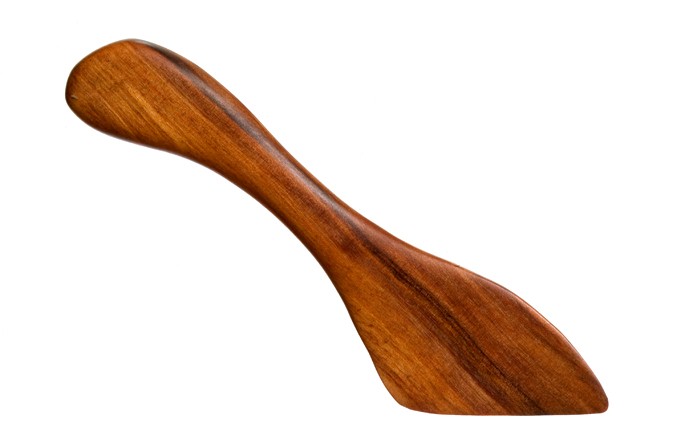
Sunday, October 9, 2011

A new Cherry kusa.

I have some new green cherry logs which are ideal for carving, a rummage through the logs produced a log I could use for a medium sized kusa. I made the most of the indian summer we were having and worked under an oak tree in my garden, I was also sheltered by a willow tree and felt well away from noise and distractions.

The log split easily with the froe and I started work. I marked out a rough shape with a pencil then with axe and spoon knife I started carving.

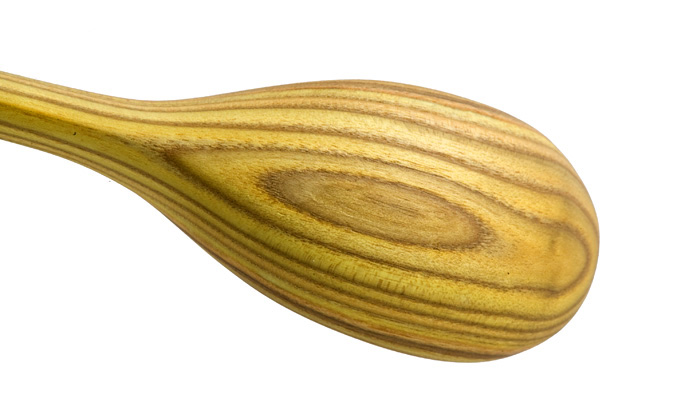
When the light started to go I placed of the wood chips in a bag and then added the part carved kuksa. next morning more carving and then some sanding produced the finished kusa.
Sadly my camera died so I only have a few images.


Saturday, October 8, 2011


I had some small pieces of wood in the shed ideally suited for making spreaders. These spreaders were traditionally used for spreading butterand jam etc. They are approx 18cm long  with the handles varying in thickness.

The wood was split and shaped with an axe, then sat under a tree in the sun a wood carving knife was used to finish shaping the spreaders. Then the finishing was done by sanding and coating in a food safe oil.


The next few are made from cherry and have wonderful colouring, the log was twisted and I left the twist in the spreader and it is still looks great and is comfortable to use.


The next two are carved from apple, the wood was twisted, gnarly and tough to carve but came out well and with a lovely colouring.
Lastly a carved oak spreader


Friday, October 7, 2011

A friend gave me a lump of willow so I thought I would use it to make a bowl.

Willow proved to be a strange wood to carve, water sprayed from it when it was hit with the axe and it scratches or dents when you just look at it.

The wood was also very light and felt weak so the bowl is a bit chunky :-)

I don't think that I will carve much willow but it was fun to sit in the woods and make the bowl :-)

The bowl is sixteen inches end to end.

Unupdate to the original post: The bowl is seasoning and the surface is getting tougher.


Monday, August 22, 2011

More Staghorn sumach

Following on from the previous post I started work on the second half of the Sumach log. This time I started hollowing in the bowl from the outside of the log rather than the split face. This created a completely different look from the colouring of the wood. The patterning in the bowl and back of the bowl being especially beautiful.


Thursday, August 18, 2011

Something special - Staghorn sumach

Something special

A friend gave me a piece of very unusual wood, Rhus Typhina, otherwise known as Staghorn sumach. The colours and the patterning are fantastic. The spoon was carved to show the beauty of the wood. 

It was not easy to carve the wood as it was very easy to tear the wood fibres, also it was intended that there should be no symmetry in the carving so getting a balance was a challenge.


Spoons from Silver Birch

Last week I collected a section of silver birch from my local nature reserve where some of the birch are being felled to allow the heathland to regenerate.

The Birch was very green and prone to tearing at the changes of grain direction but apart from that it was a pleasure you carve, I used this carving session to try differing handle shapes.


Buddleia Spoons

We cut back a Buddleia in the garden and I thought I would try carving some spoons from the largest offcut. The wood split nicely and I managed to make five different spoons. 

It was nice to carve and takes a very smooth finish.

Tools used, froe, axe and knife.

Wednesday, June 29, 2011

Two bowls

Two bowls

Two bowls sitting on silver birch
Walking in my local nature reserve I noticed a silver birch being taken down so I had a chat with the warden and he kindly allowed me to take a branch away.
A week or so later I gathered some tools, froe, axe, large knife and a spoon knife and started work on two bowls.

  
The first step is to split the log into two halves and then start carving with the axe, the axe is used to quickly remove wood and rough out the intended shape. The shape is then refined with the large knife and the spoon knife is used to hollow the bowl.

Although the wood was split into two very similar halves the carving produced two very different bowls, the shape, thickness and curvature comes from working with the wood and not against it.


Saturday, May 7, 2011

Green wood furniture

The issue I have with tendonitis is still making carving difficult so I am using my woodworking time in different ways. A visit to my local wood with some friends and excellent green wood workers gave me the opportunity to try making some furniture for my garden workshop.

I decided to make a bench which looks easy but of course is not. Two of my friends were making planks from an oak tree using a chainsaw milling technique and they were kind enough to give me a large plank.
The first step was to cut the plank to a sensible size for a bench which was easy enough. I then found a chestnut log which I split into four lengthways and used a drawknife to reduce the ends of the legs to a one in section.

Back to the plank and the tricky bit was next, a hole needed to be drilled at each corner, at an angle that allowed the legs to splay in two directions. A chat with friend Will (who knows everything) and I was measuring and marking up the angles. Then to the drilling, I concentrated on one angle while Will used a sliding bevel to guide me on the other angle. Drilling was done with a brace and bit, a little effort and the holes were ready for the legs.


Making the bench left some offcuts so I made a chair, same principle but with the addition of a back fitted loose with a mortice and tenon.


I do still have to run a spokeshave around the edges, shape the back and obviously cut out a heart shape in the back :-)


Saturday, April 16, 2011

Mocotaugan style knife

Tendonitis in my elbow caused by too much carving is stopping me carving the bigger projects so what to do instead?

Duncan at Dorset Woodland Blades recently made me a pair of curved blades for working bowls and other deep objects, it would be nice to try something new when I make the handles for these. Note one blade is left handed the other is right handed.


This would be an ideal smaller project that will allow me to try my new bowl horse on a very small item The bowl horse performed very well giving my gripping hand a rest and keeping the wood steady.


The Mocotaugan blade is usually less curved but I thought that the bent handle would design would suit my blades. The Mocotaugan can trace it's history back to flint bladed knives in the stone age.


So here is my take on the Mocotaugan.


This was an interesting project and maybe I will do more of this type of carving one day :-)

For more on the Mocotaugan see, http://www.mocotauganthebook.com/